Tag Archives: gift

DIY orange surprise balls

9 Dec

Did you get an orange in your stocking when you were growing up? I always did, right in the toe. Something to do with Santa paying someone’s dowry or my grandpa having to eat the orange “peel-n-all” during the depression or something like that. I thought these surprise balls would be a fun twist on that old tradition. They can be made big or small, I tried to keep mine close to the size of a small grapefruit (it’s supposed to be an orange after all).#DIY orange surprise balls

Supplies:

several different colors of crape paper including orange

small surprises (stickers, erasers, etc.)

white glue

scissors

green construction paper

a button

First cut the crape paper in half (HonestlyWTF suggests using crape paper sheets and cutting it into stripes but I wasn’t sure where to find that in town so I used streamers). This step was a little tedious.

Start wrapping your surprises up! I started with something round (a light-up ball) to help get the right shape. Just wrap the first surprise in crape paper until it is fully covered. Then switch colors and add another surprise. Keep wrapping and adding items until everything is inside! Make sure to use orange for the final layer.

WrapingSurpriseBall
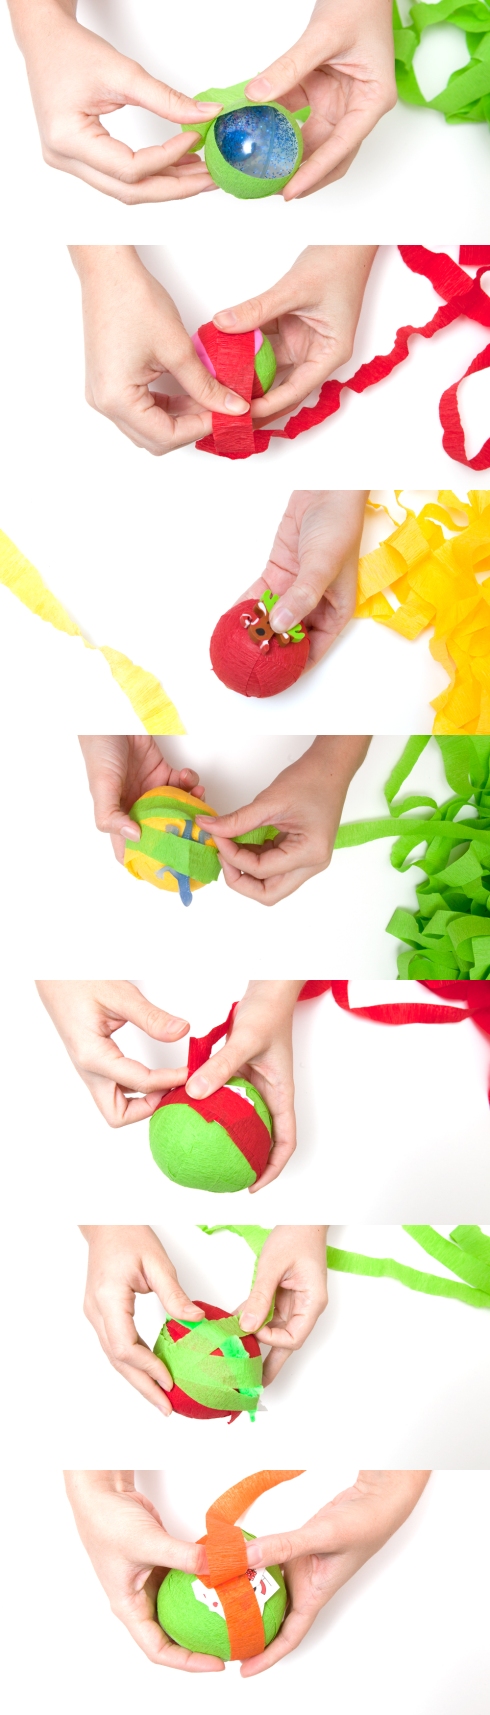
Now that everything is all wrapped up. Use a dab of glue to secure the end. Then cut a couple small leaves from the construction paper and glue them over the end and glue the button on top of the leaves. Let it dry and it’s ready to be unwrapped!

If  you wanted to tell the story behind the tradition, you could add it on strips of paper with the surprises.

Side note: Dogs don’t really like crape paper

_MG_4629

Stocking Stuffers for Her

2 Dec

My stocking stuffer giveaway is over and the winner was notified this morning by email. Thank you all for participating. It was quite successful and I will definitely be doing it again!

With stockings and Christmas on the brain, here are some things I want stocking stuffer ideas for the twenty-something, creative woman you know. Perhaps you’ll see a few things you need to pass on to your own personal Santa.

Stocking Stuffer for Her by Making Mondays

StockingStuffersforHer2

StockingStuffersforHer3

For all the links and a lot more ideas check out my ever-growing pinterest boards:

Stocking Stuffers for Her

and

Stocking Stuffers for Him

DIY instant comfort boxes

18 Nov

I saw these adorable matchboxes from  Kim’s Little Monsters and thought I would make some of my own. These will make great little gifts or stocking stuffers. The best part is that you can use whatever supplies you have on hand and really personalize them. Don’t worry too much about making them perfect, the imperfections add to their charm.

#DIY instant comfort box by Making Mondays

Supplies

empty matchbox

scrapbook paper/paper/washi tape

pens/markers/colored-pencils/paints (whatever you prefer)

cardboard

scissors

glue

First wrap the outside.

#DIY instant comfort box from Making MondaysThen draw the cover. Cut to size and glue on the top.

#DIY instant comfort box by Making Mondays

Now decorate the inside. Cut a decorative background and glue it into place. Then make a character. If you’re not a great at drawing, you can use a photo or clipart. Cut out your character and glue to a small piece of cardboard (smaller than the character so you won’t see it). This will add depth. Glue it into place.

#DIY instant comfort box by MakingMondays

Lastly, add words of encouragement. Draw a ribbon and write in something sweet. Cut it out and leave a tab on the side. Fold and glue the tab to the side of the matchbox.

Stocking Stuffers for Him

13 Nov

I went to the mall this past weekend and it was packed. Having a flashback to last year, I decided I need to get all my Christmas shopping done ASAP. I don’t want to step foot in a store after Thanksgiving. No parking garage traffic jams, crowded stores, and mile-long lines for me.

So this week I got right to work figuring out who/what I needed. Luckily I don’t have many people to shop for as most of my family/friends will be getting handmade gifts or paintings.

Here are some stocking stuffer ideas for the man in your life.

Stocking Stuffers for Him from MakingMondays.wordpress.com

Stocking Stuffers for Him by Making Mondays

Stocking Stuffers for Him from MakingMondays

For links to this stuff and the rest of the ideas I came up with in the process check out my pinterest boards:

Stocking Stuffers for Him
and
Stocking Stuffers for Her

What do you guys think? Any other ideas?

Chocolates by Kerry Can

7 Nov

These delicious, small-batch, handmade chocolates that I won from Kerry at Love Those “Hands At Home” came in the mail today. Two of my favorite things mail and chocolate! What a good day.Chocolates by Kerry CanThey are from her Etsy shop, Kerry Can, where she shares her passion for candy making and some of her vintage finds. In addition to these 3 yummy candy bars, she included an assortment of chocolate covered caramels that were amazing! I’ve tried my hand at caramel making before and have never been able to produce something so perfect. Kerry has clearly mastered the process. The caramel was buttery-sweet and gooey but didn’t stick to my teeth too much like some caramels.Chocolates by Kerry Can

Turtles have always been my favorite candy and these did not disappoint. But the ginger caramels may be my new favorite! Wow! I have no idea why I’ve never had a ginger caramel before, these should be in every heart-shaped candy box. You will not regret ordering a batch of these, but you may regret how quickly they disappear. They will definitely test your self-control.

Thank so much Kerry! Keep up the delicious work!

DIY postcard coasters

21 Oct

DIY postcard coasters by MakingMondays.wordpress.com

I picked up these beautiful vintage botanical chart postcards a couple weeks ago. And I’m feeling kinda selfish, they are just too beautiful to share. After a long internal debate over whether or not I should simply frame them, I decided to turn them into coasters! I’m so glad I did because they turned out amazing with a really thick, high-gloss finish. Looking around the internet there are a lot of different tutorials for making coasters, this is the way I did it.

Supplies

tiles

postcards

scissors

white glue

cheap brush or foam brush

pour-on epoxy resin (I used Envirotex)

plastic cups

drop cloth/cardboard/paper

felt pads

#DIY postcard coasters by makingmondays.wordpress.com

Cut postcards to size. I cut mine into 3 ½ inch squares.

#DIY postcard coasters by makingmondays.wordpress.com

Coat the back of the postcard with glue and place it onto the clean tile. Make sure you get the postcard positioned correctly and press it down to remove any trapped air. Coat the top with a layer of glue. Don’t worry about brush strokes, they will disappear when you apply the resin. Allow to dry completely.

#DIY postcard coasters by makingmondays.wordpress.com

Use a disposable cup to elevate your tile, so the resin runoff will not pool under the tile. Put down a piece of cardboard to catch the runoff.

Pour on the epoxy as directed on the package. For more thorough instructions on using Envirotex, check out this incredible step-by-step from Homemade Gifts Made Easy.

#DIY postcard coasters by MakingMondaysAllow to dry completely, which took 3 days in my case. The resin was easier to use and less messy than I expected. I highly recommend it if you want a professional finish. Mine turned out smooth, even, and really glossy.

#DIY postcard costers by MakingMondays.wordpress.com

Attach felt pads to the bottoms and you’re done.

The total cost of this project was around $10 (but there was enough resin left to do a lot more than 4). The postcards were 25¢ each, the tiles were 16¢ each, I already owned the glue, disposable cups were a $1, and the pour-on resin was $7 from Michaels with a 50% off coupon (it can be found in the glue section). They took less than an hour of active time to make, but took several days if you include drying time.

If you aren’t feeling selfish like me, these would make a great gift.

Cooking with Pinterest: Roasted Garlic Olive Oil

16 Oct

I am a garlic fanatic, so naturally this is something I keep on hand all the time.

Roasted Garlic Olive Oil by Pixelated Crumb

This oil is amazing drizzled over hummus or on a salad with a little salt and pepper or in mashed potatoes or over veggies, so many possibilities. The flavor is full and rich. It’s a great way to upgrade your cheap olive oil.

Plus you end up with a whole bunch of roasted garlic! Delicious. Roasted garlic should be can be added to almost anything. It’s great on chicken, fish, or veggies. It mixes well into dips. It can be smeared on bread and toasted for absolutely perfect garlic bread. Trust me, you will find a use for all that lovely roasted garlic.

If you’ve never made this, head over to the Pixelated Crumb for the recipe and get started immediately. You will not regret it. Plus with all the holiday parties and dinners coming up this makes a great hostess gift.

DIY friendship bracelet kit with *FREE PRINTABLES*

6 Aug

I put together this friendship bracelet kit to send to a certain 9-year-old I know. She doesn’t have any experience making bracelets, so I went with a really simple design. If you want something more complicated there are lots of patterns around the web.

#DIY friendship bracelet kit by makingmondays

Supplies:

embroidery floss in a few colors

cardboard

safety pin or tape

instruction sheet

envelope

I went to the trouble of putting my floss on spools, because it will be much less likely to turn into a tangled ball. Since it is going to a 9-year-old, this is very important. It also allows you to use up embroidery floss you already have.

#DIY friendship bracelet kit by makingmondays

Cut your cardboard into spools. You can cut a template out of graph paper or just wing it. I cut the cardboard into 2inch squares then cut in the indentions freely. Cut a slit in one end of the spool to secure the loose end of floss. Then just wrap the embroidery floss around the spools.

double knot bracelet pattern by makingmondays

Click on the image above to open it full size and print out the instruction sheet.

Then follow the instructions to include a completed bracelet as an example.

#DIY friendship bracelet kit by makingmondays

Put it all together in a cute envelope and you’re done. I made my envelope out of vellum; I like that it alludes to the contents yet, without knowing you still can’t quite guess what it will be.

#DIY friendship bracelet kit by makingmondays

DIY dipped cans

3 Jun

This is a simple, cute way to share cuttings or starters of your favorite plants.

#DIY dipped cans by makingmondays

Supplies:

Tin Cans

Paint

Hammer and nail

Small rocks or pottery shards

Dirt

Succulent cutting, herbs, or whatever you prefer

Scrapbook paper or origami paper

Scissors

Glue

#DIY dipped cans by makingmondays

I used some paint I found in my garage. But you might check out the rejected paint shelf at your local paint superstore, you can usually get bright colors on the cheap because they were mixed wrong. Too bright for walls is perfect for crafts.

Dip the cans directly into the can of paint as deep as you’d like. Allow excess to drip off for a minute. Set on wax paper to dry. Move a few times during drying to prevent the excess paint from pooling and drying around the bottom edge.

#DIY dipped cans by makingmondays

Holes provide drainage, which is important for succulents. Add about 6 using a hammer and nail. If you intend to use this indoors such as on a desk or windowsill, you do not have to poke holes. Just be careful not to over water.

Put a layer of small rocks in the base of the can. Fill with dirt. Plant and water.

If you want to make it a gift, follow these fantastic instructions for an origami bow from Let’s Create.  Attach it to the front with glue. If using a glue with a long drying time, use a clothes pin to hold the bow in place while it dries.

Pen Pal Kit with *FREE PRINTABLES*

27 May

Everyone loves mail! Chris and I sent a pen palling kit to his little sister this week. She is 9 and she wrote him during the school year for class. Her letters were great and it gave him a chance connect with her in a different way. It was interesting to see what was important to her and what she choose to write about.  He’s learned things that he wouldn’t have even thought to ask about, like she learned cursive this year and after about 4 letters it started to be readable. Did I mention her drawings? Amazing. Anyway, he is hoping this will keep her interested now that it’s not a requirement.

But this would also be a great way to start pen palling with someone you don’t get to see enough.

#DIY pen pal kit by makingmondays

Items to include:

Photo Box to put it all in

Envelopes

Postage Stamps

Construction Paper/Scrapbook Paper/White Paper/Stationary

Die-cut shapes

Stickers (letters and cool things)

Tape

Glue stick

Scissors

Pencils/Pens/Markers/Colored Pencils/Glitter Pens

Notebook (optional, we decided to send a notebook back and forth rather than traditional letters, so the conversation is complete for her to look back at later)

Choose a notebook that appeals to you and personalize it. On the back inside cover, we added a handmade envelope to send secret messages, pictures, and other finds. And on the first page, we put a map of the US with our location and her location marked so she has a better understanding of where we are.

#DIY pen pal kit by makingmondays

Make your letter fun and personal. If your pen pal is young, it is important to give them examples of what they can do through your letter. And there is so much you can do. You could paste in comics and photos . Or start a correspondence game of tic-tack-toe or hangman. Or write a secret code key and include a message to decipher. Be sure to give them something to write back about. To get the process started, you can print these fill in the blank questions for your pen pal to answer.

FILLINTHEBLANK printable by makingmondays

Lastly, we attached our address to the lid of the box, so it can’t get lost. If your pen-pal hasn’t mailed a letter before, you may want to use this as an address label and an example of how their envelope should look.

envelope printable by makingmondays

FREE PRINTABLES click on the images above to open them as full size PDFs, then you can save or print the files from there!

P.S. How great would this be as a going away present?