Cooking with Pinterest: Beauty Edition

9 Jan

As a native New Mexican, I have always fought the great fight against dry skin. Moving to California has helped tremendously, but in the winter months the fight still lives on.  In addition to dry skin, I have mild skin allergies which limit my use of most yummy smelling, mass-produced skincare products. My latest ally is this coffee and coconut oil body scrub from Pure EllaPure-Ella-Firming-and-Softening-Body-Scrub
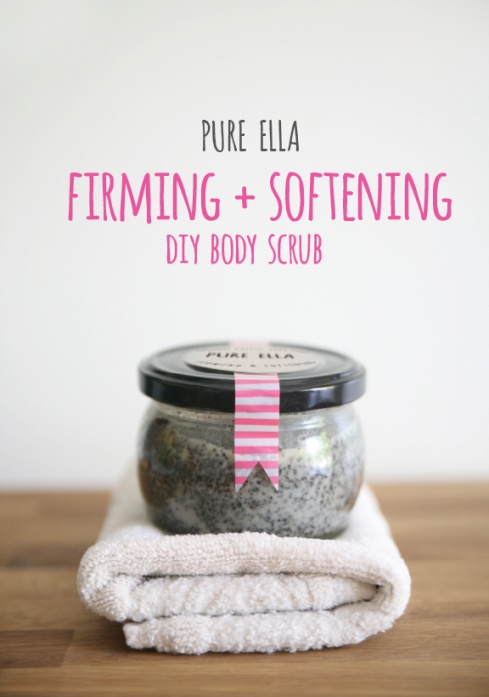
It’s effective and it smells delicious. I have been using this body scrub a few times a week for about a month now and have nothing bad say about it. My skin feels so much healthier than before, it’s not dull or tight and no more dry patches. Plus the smell of coffee fills the shower, the perfect way to wake up. The caffeine from the coffee is supposed to be skin firming, Ella gives a good explanation for this. I haven’t really noticed, but I’d recommend it regardless.

When it’s cold it can be a little difficult to get out of the container, so I keep a spoon with it. It melts with the warmth of your hands and spreads on easily.

I’m about to run out of my first batch and I will definitely be making more. With the next round, I may add a touch of cinnamon  to play with the aroma.

DIY recycled calendar envelopes

6 Jan

It’s time to change calendars and I couldn’t let the perfect Sierra Club landscapes of last year go to waste, so I made some envelopes.  DIYEnvelope7

Supplies

old calendar pages

ruler

scissors

glue

washi tape (optional)

SuppliesforEnvelopes

I made 4×6 envelopes. I started by drawing a big 8inch by 10inch square on the back. I usually free hand the rest of this but here is a template to show you what I do.

DIYEnvelope8Cut out the large rectangle. Then take 1 inch off of each side of the bottom flap and 1 inch off each side of the top flap. I also trim the top flap at this point, which are the diagonal lines I drew in.

DIYEnvelope11Just add some washi tape around the edge and you’re ready to send it. I suggest using a white paint marker or metallic Sharpie for addressing darker pages.

DIYEnvelope13I also used a couple pages to line envelopes I had on hand. Simply trace the envelope on the image, cut it out, slide into the envelope, and the secure it to the flap with a line of glue.

2014

31 Dec

After an extended holiday, I’m looking forward to a new year. I’m finally starting to feel at home in the city and it already/still feels like spring here, which has me so inspired and motivated. Here are some things I want to do this year. blogbetterI’m really proud of this space and all I can think about is making it better. I want to keep a more regular posting schedule and get ahead on posts, how great would it be to have things put together a week or two in advance? I also want to improve my blog photography, particularly staging and layout.
takemorephotosPractice makes better, right? I want to try a 365 photo project, maybe one with prompts like The Idea Room’s or Fat Mum Slim’s.
usecookbooksLast year I got into the habit of regularly trying new recipes by starting to cook through my Pinterest food folder. The real secret is remembering to pick up unusual ingredients on grocery day. This year I want to pay more attention to my ever-growing cookbook collection. Here’s a couple I got for Christmas. cookbooks2readmoreSince I graduated college, I have finished a pathetic number of books. This has to change. Here are a few titles already on my bookshelf to get me started. I’d love recommendations, read anything good lately?BooksToRead

DIY orange surprise balls

9 Dec

Did you get an orange in your stocking when you were growing up? I always did, right in the toe. Something to do with Santa paying someone’s dowry or my grandpa having to eat the orange “peel-n-all” during the depression or something like that. I thought these surprise balls would be a fun twist on that old tradition. They can be made big or small, I tried to keep mine close to the size of a small grapefruit (it’s supposed to be an orange after all).#DIY orange surprise balls

Supplies:

several different colors of crape paper including orange

small surprises (stickers, erasers, etc.)

white glue

scissors

green construction paper

a button

First cut the crape paper in half (HonestlyWTF suggests using crape paper sheets and cutting it into stripes but I wasn’t sure where to find that in town so I used streamers). This step was a little tedious.

Start wrapping your surprises up! I started with something round (a light-up ball) to help get the right shape. Just wrap the first surprise in crape paper until it is fully covered. Then switch colors and add another surprise. Keep wrapping and adding items until everything is inside! Make sure to use orange for the final layer.

WrapingSurpriseBall
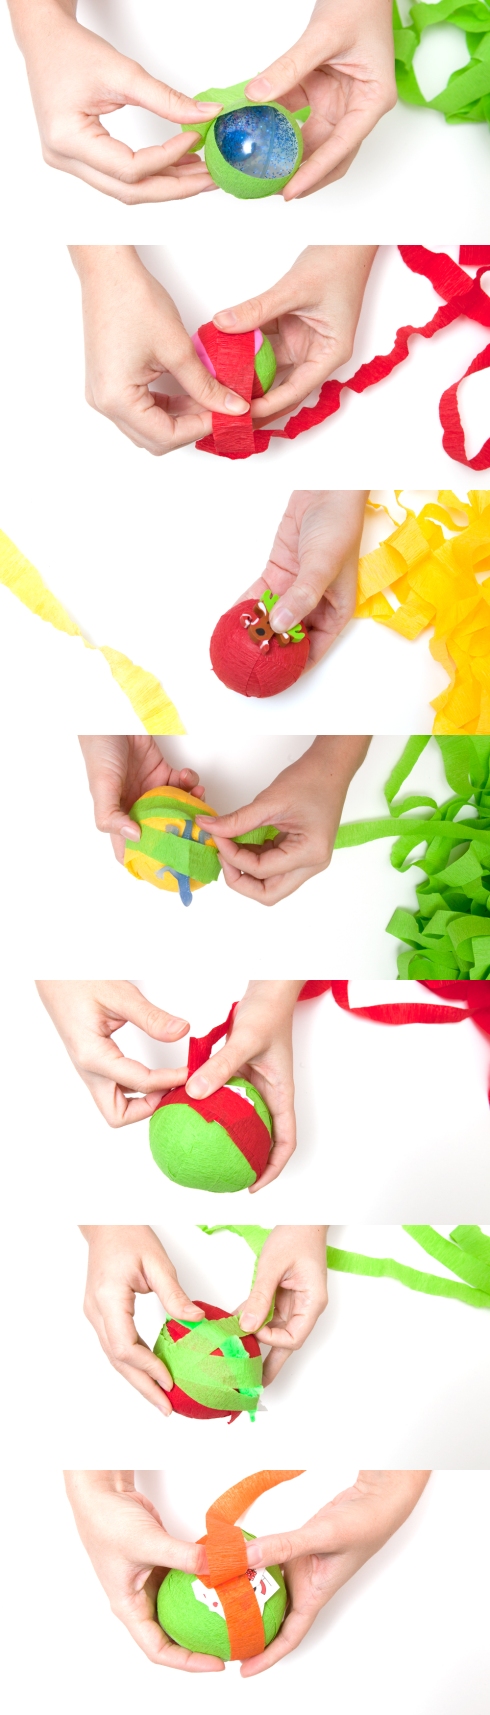
Now that everything is all wrapped up. Use a dab of glue to secure the end. Then cut a couple small leaves from the construction paper and glue them over the end and glue the button on top of the leaves. Let it dry and it’s ready to be unwrapped!

If  you wanted to tell the story behind the tradition, you could add it on strips of paper with the surprises.

Side note: Dogs don’t really like crape paper

_MG_4629

Stocking Stuffers for Her

2 Dec

My stocking stuffer giveaway is over and the winner was notified this morning by email. Thank you all for participating. It was quite successful and I will definitely be doing it again!

With stockings and Christmas on the brain, here are some things I want stocking stuffer ideas for the twenty-something, creative woman you know. Perhaps you’ll see a few things you need to pass on to your own personal Santa.

Stocking Stuffer for Her by Making Mondays

StockingStuffersforHer2

StockingStuffersforHer3

For all the links and a lot more ideas check out my ever-growing pinterest boards:

Stocking Stuffers for Her

and

Stocking Stuffers for Him

Foodie Pen Pals #3

30 Nov

FoodiePenPals

For November’s Foodie Pen Pal Swap, I was so lucky to be paired up with Lindsey from Running With Whisks. She is an avid runner and healthy foodie from Ohio. She sent me a bunch of Midwestern treats and a RECIPE! I love new recipes and I must say this one is amazing. First off, here’s what she sent me:

Foodie Pen Pals

Coffee from La Crema Coffee Company
Skyline Cincinnati-style Chili
Reese Dark Chocolate Peanut Butter Cups
Larabar Pumpkin Pie Bar
Lipton Green Tea
Montgomery Inn Barbecue Sauce
Crystal Light Green Tea
Roasted Almonds

Here are my thoughts:

The coffee was great. She sent two seasonal flavors from her favorite local coffee shop. How sweet!

I loved the Roasted Almonds! So good! She made them herself, they were just a little sweet and very cinnamony. Really prefect.

My absolute favorite thing was this recipe though. I made it for Thanksgiving and it did not disappoint!

Sweet Potato BiscutsThanks again Lindsey!  And thanks to the Lean Green Bean for setting up the swap every month! If you want to join in for January, just jump over to her page and sign up!

PS Don’t forget to sign up for my stocking stuffer giveaway! It ends on Sunday!

Thanksgiving Menu

26 Nov

I’m pretty excited for Thanksgiving. We aren’t traveling this year, so I get to cook! I tried to keep it simple, hopefully it’s delicious enough to forget I skipped a few traditional favorites (sorry sweet potato casserole, maybe we’ll see you next year). Here are the recipes I’m planning to use:

TurkeyBrined Turkey and Green Chile Cornbread Stuffing

ThanksgivingSides

1. Cranberry Orange Sauce 2. Pomegranate, Feta, Walnut Salad 3. Sauteed Green Beans with Mushrooms and Caramelized Onions 4. Spinach Mashed Potatoes

DessertPear Ginger Cocktails and Pumpkin Pecan Pie

I think it will work out well. The cranberry sauce and salad dressing can be made the day before (that’s tomorrow); the pie crust and filling can also be made the day before then assembled just before cooking; this just leaves 3 sides to actively make, a salad to throw together, and the turkey which will be brined and roasted in a bag so there isn’t much to do once it’s in the oven.

I hope you all have a great Thanksgiving! Don’t stress too much and never be afraid to ask for help, you won’t be the only one eating there is no reason you should be the only one cooking. Besides the best memories are made together.

P.S. photo credits belongs to the respective blogs

Stocking Stuffer Giveaway

20 Nov

NOW CLOSED

I’ve really gotten a jump on my Christmas shopping, just a few things left to order from Amazon. It feels good to be ahead, but I’m nowhere near close to finished. Now I have the whole month of December to focus on making gifts for the rest of my list!

In the spirit of giving and as a big thanks to all you guys for following, I put together a little stocking stuffer giveaway to help you get started on your boyfriend/husband/son/your own/whoever’s stocking.

Making Mondays Giveaway

Key Chain • Mini Sketchbook • Mini First Aid Kit • LED Flashlight
Quintin Co. Beanie • Little Trees Car Air Freshener • Whoopee Cushion

You must enter through the Rafflecopter link below. You have 5 chances to enter: Follow my blog, Leave a contact email address, Comment on this post, Follow me on Pinterest, and Follow me on Twitter.

Follow this link to enter the giveaway

This giveaway will run until Sunday December 1st at midnight. Winner will be randomly selected, notified via email, and announced here on Monday December 2nd. Winner will have 48 hours to respond with their address or a new winner will be chosen.

For some stocking stuffer ideas, check out my Pinterest boards:

Stocking Stuffers for Him
and
Stocking Stuffers for Her

DIY instant comfort boxes

18 Nov

I saw these adorable matchboxes from  Kim’s Little Monsters and thought I would make some of my own. These will make great little gifts or stocking stuffers. The best part is that you can use whatever supplies you have on hand and really personalize them. Don’t worry too much about making them perfect, the imperfections add to their charm.

#DIY instant comfort box by Making Mondays

Supplies

empty matchbox

scrapbook paper/paper/washi tape

pens/markers/colored-pencils/paints (whatever you prefer)

cardboard

scissors

glue

First wrap the outside.

#DIY instant comfort box from Making MondaysThen draw the cover. Cut to size and glue on the top.

#DIY instant comfort box by Making Mondays

Now decorate the inside. Cut a decorative background and glue it into place. Then make a character. If you’re not a great at drawing, you can use a photo or clipart. Cut out your character and glue to a small piece of cardboard (smaller than the character so you won’t see it). This will add depth. Glue it into place.

#DIY instant comfort box by MakingMondays

Lastly, add words of encouragement. Draw a ribbon and write in something sweet. Cut it out and leave a tab on the side. Fold and glue the tab to the side of the matchbox.

Stocking Stuffers for Him

13 Nov

I went to the mall this past weekend and it was packed. Having a flashback to last year, I decided I need to get all my Christmas shopping done ASAP. I don’t want to step foot in a store after Thanksgiving. No parking garage traffic jams, crowded stores, and mile-long lines for me.

So this week I got right to work figuring out who/what I needed. Luckily I don’t have many people to shop for as most of my family/friends will be getting handmade gifts or paintings.

Here are some stocking stuffer ideas for the man in your life.

Stocking Stuffers for Him from MakingMondays.wordpress.com

Stocking Stuffers for Him by Making Mondays

Stocking Stuffers for Him from MakingMondays

For links to this stuff and the rest of the ideas I came up with in the process check out my pinterest boards:

Stocking Stuffers for Him
and
Stocking Stuffers for Her

What do you guys think? Any other ideas?